Mounting Oracle Cloud Storage as Volume in Containers with Kubernetes.
In my attempt to deploy a Machine Learning model with Kubernetes, I need to find a way to mount files hosted on Oracle Cloud Storage bucket to a docker container via Docker Volumes and later to Kubernetes using Kubernetes Volumes.
I looked up online and couldn’t find a post that fit my needs hence why I decided to write this guide to highlight my approach and learnings.
In this post, you will learn how to mount data in Oracle Cloud Storage or any other cloud object storage to a docker container and Kubernetes pods via Volumes. It is the second post of a series of posts that I am writing on deploying machine learning models on Kubernetes. In the first post, we learned how to use the ONNX runtime, and the triton inference server to deploy our model as a docker container. However, in that post, we saw the need to use a model registry to save our model files.
You will best benefit from this post if you already have some Docker containers and Kubernetes components knowledge. As for the prerequisites, I suggest that you have Docker and Kubernetes installed on your machine. Additionally, you need access to a Kubernetes cluster either via Minikube (local access) or via a cloud provider. In my case, I am using Oracle Cloud.
I have used a cloud storage bucket as my model repository and hosted my machine learning model in it, making this post a more Machine Learning oriented one. Having said that, web developers can use the same approach illustrated in this post to share web static files such as CSS, and images.
Let start by defining what is the Object Storage.
What is Object Storage?
An Object Storage is a data storage architecture for storing unstructured data.It sections the data into units—objects and stores them in a structurally flat data environment. Each object includes the data, metadata, and a unique identifier that applications can use for easy access and retrieval. Source
With Object Storage, the data blocks of a file are kept together as objects, with a custom identifier and relevant metadata about them. This type of storage architecture is well suited for unstructured data such as video, music, and email which is written once and read multiple times.
It is different from File Storage, where data is organized as files, and folders as files in real life. It is also different from Block Storage which is a performance improvement of file storage where files are broken into separate blocks and stored separately.
Many cloud storage providers have stores that implement object storage architecture. In that storage, files are saved in buckets. The most common type of object store is Amazon Simple Storage Service (S3). Then comes Google Cloud Storage(GCS). Oracle Cloud, the storage we will be using in this post is one of the other S3 and GCS alternatives. You can check other S3 alternatives here.
That being said, we can confirm that everything you can do on Amazon S3 can be replicated on other cloud provider object storage.
Now that we know more about object storage , the next concept to grasp is Volumes.
What are Docker and Kubernetes Volumes?
Docker Volumes.
Docker containers are stateless components, at the end of their lifecycle their contents are destroyed. All the data generated by a container and saved inside are deleted on its destruction. Volumes are handy when it comes to sharing data with a container, and to persisting data generated by a container. The most common use cases of docker volumes that I can think of on top of my head in Web Development are :
- Sharing static files with web application
- Persisting data generated by a database container.
In Machine Learning however, docker volumes mostly share model files with a deployment container, or sharing model training files with a training script.
You can read more about docker volumes here.
Kubernetes Volumes.
Kubernetes volumes are similar to docker volumes. They can be seen as directory containing data accessible by multiple containers in a pod. On top of sharing data and persisting data with a pod, Kubernetes volumes help to share data between containers in the same pod.
Kubernetes offers different types of volumes, you can read more about them here
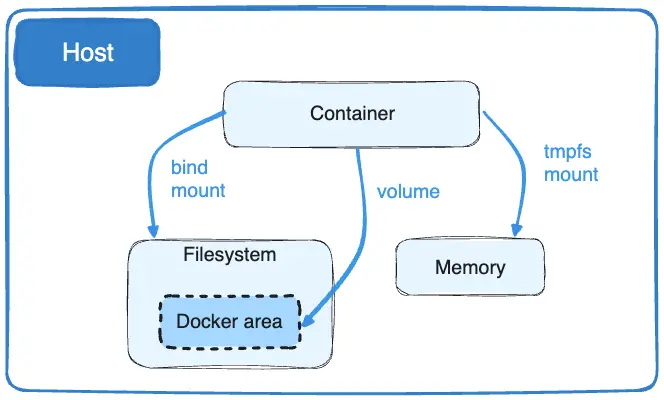
In this post, we will be interested in two types of them, the hostPath and PersitantVolume.
A hostPath volume mounts a file or directory from the host node’s filesystem into your Pod. This type of volume is not recommended for production-grade applications because it presents many security risks. It is recommended to use PersistantVolume and PersistantVolumeClaim instead.
Enough theory, let us write code.
Our Architecture.
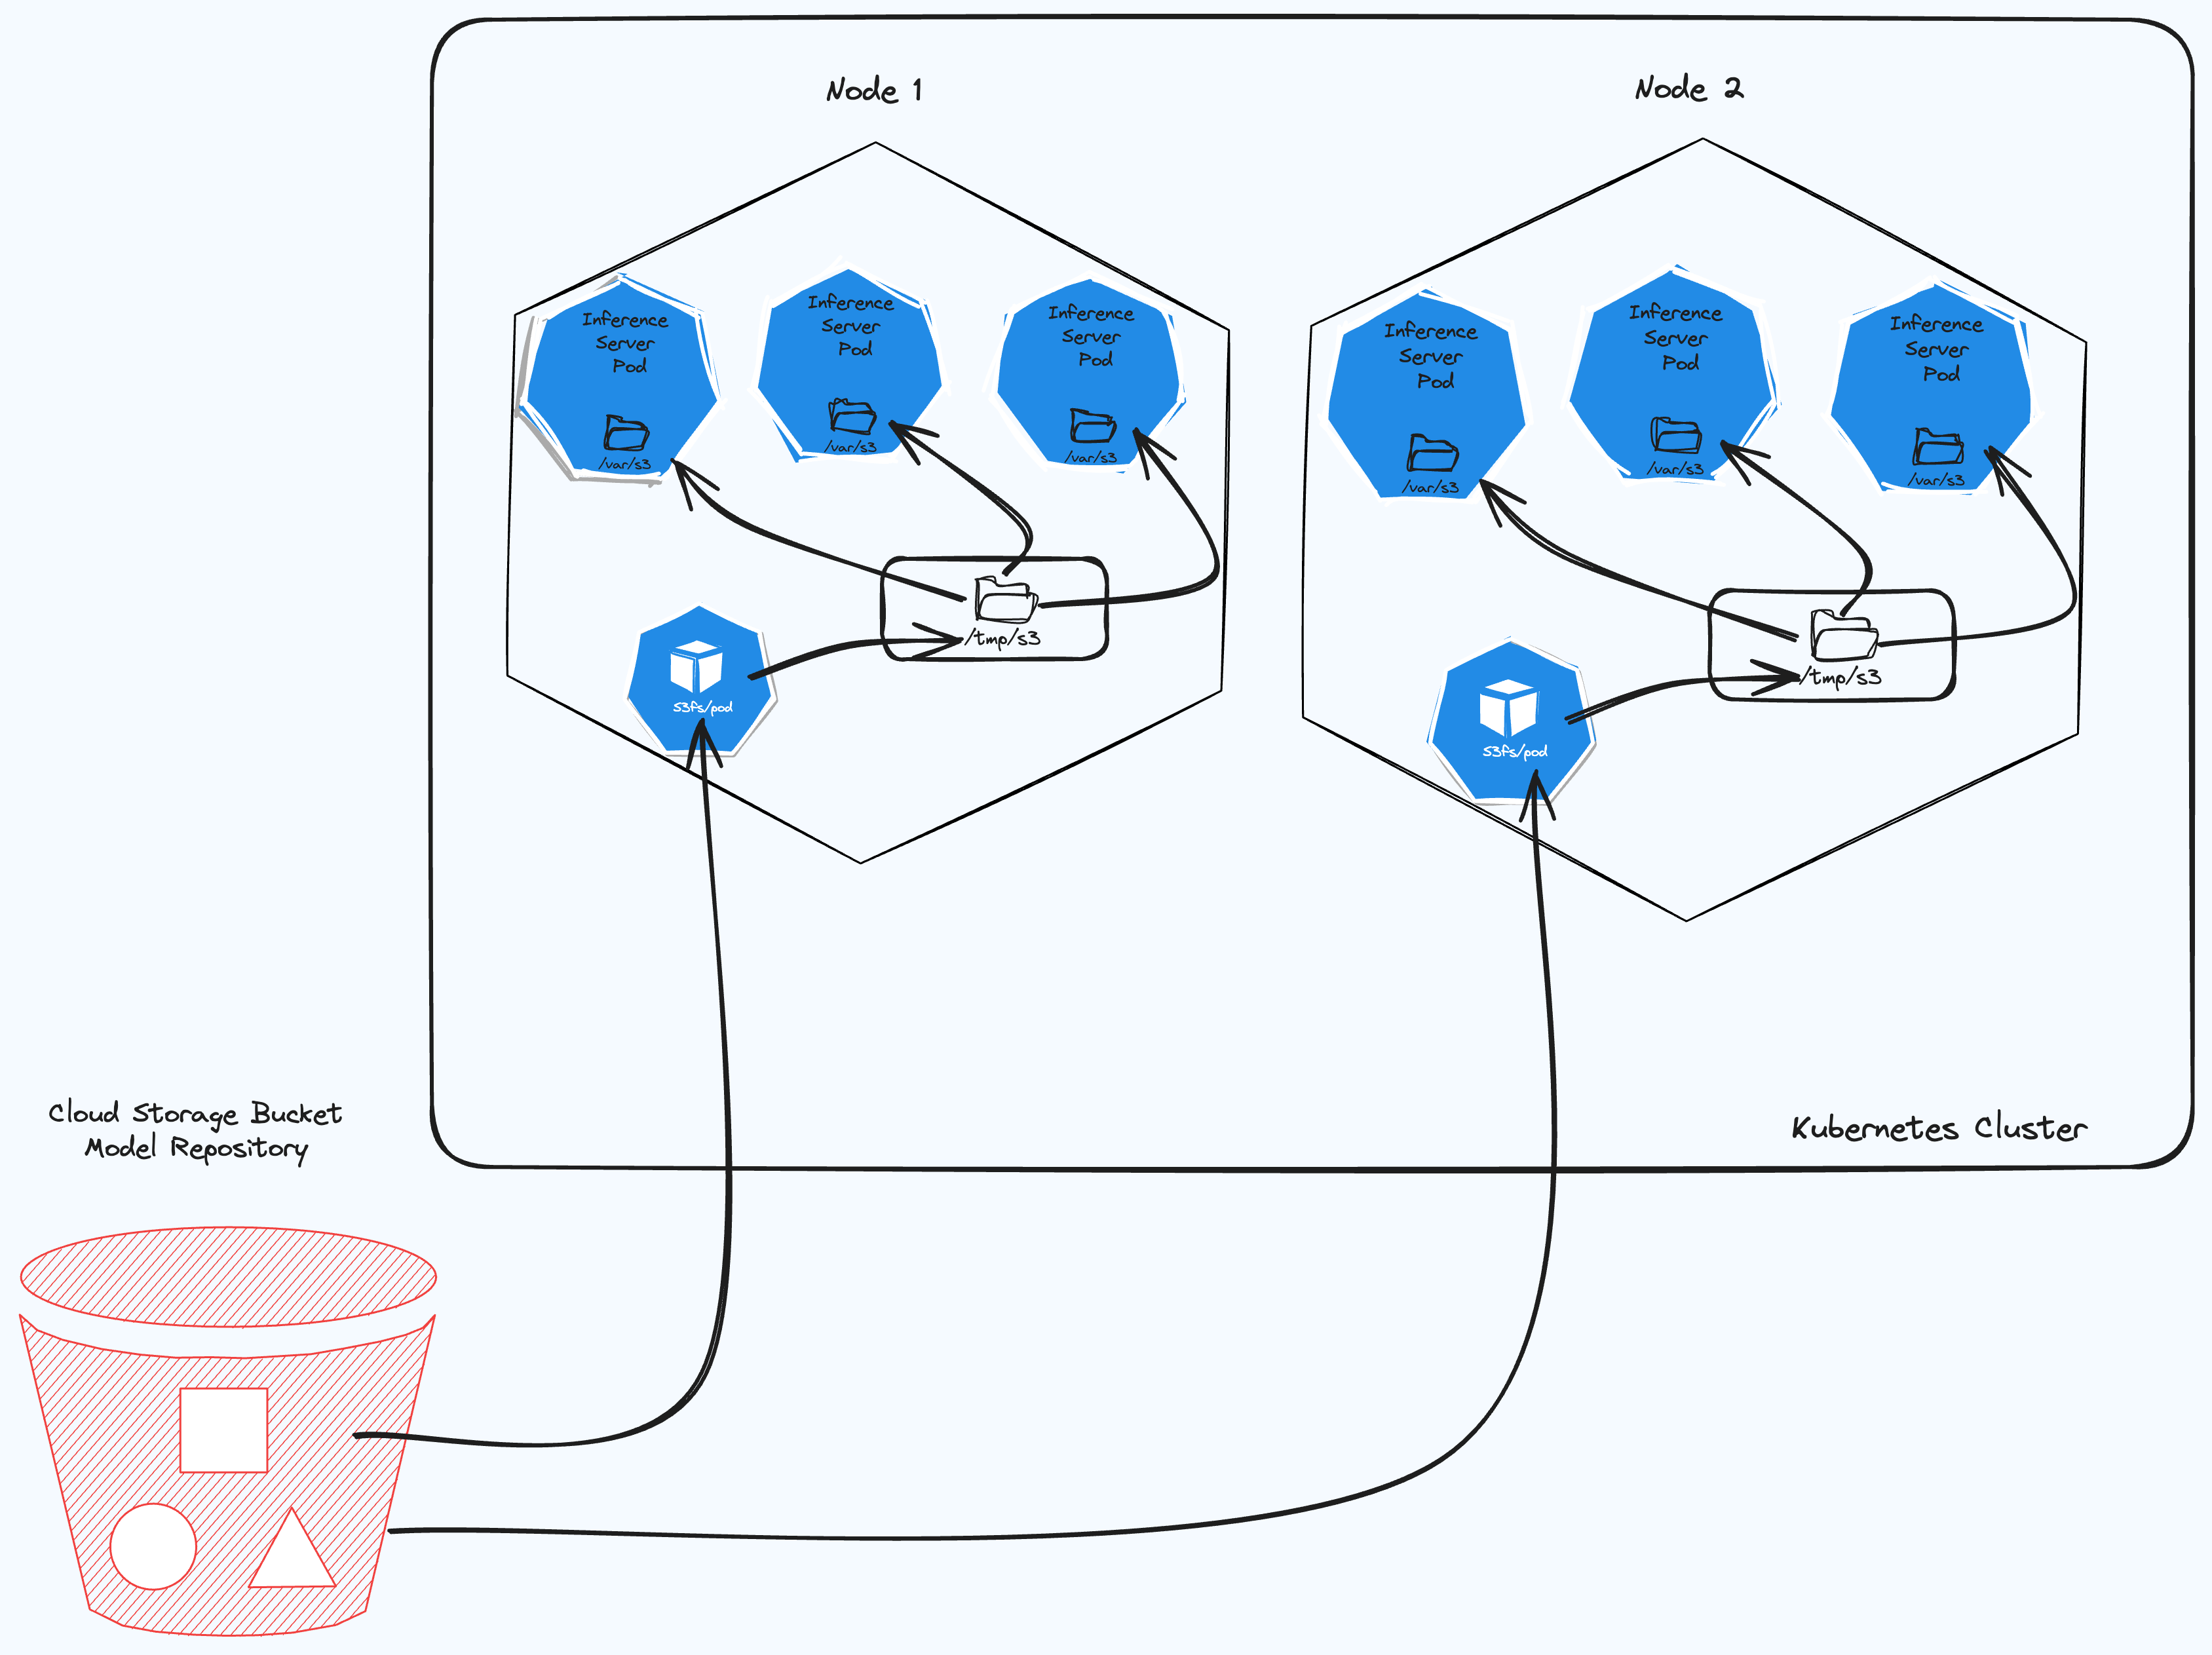
In the figure above, we have the architecture diagram of what we are we will be deploying in this post.
For our model container need to access models files, that are are in our registry.
Mounting Object Storage Bucket in a docker container.
We will be using the s3fs library, which is a tool that allows Unix/FreeBSD OS to mount object storage buckets via FUSE(Filesystem in UserSpace). It helps us to operate files and directories in an S3 bucket like a local file system.
You can install it in any Unix system and mount the bucket path to your local machine.
For our use case, we will install it and use it in a docker container.
First Step : Create the Script.
To mount our bucket we will use the following script, let name it run.sh:
echo "$ACCESS_KEY_ID:$ORACLE_CLOUD_SECRET" > passwd && chmod 600 passwd

URL=https://$TENANT_ID.compat.objectstorage.$REGION.oraclecloud.com

s3fs -f -d $OCI_BUCKET $MOUNT_POINT -o endpoint=$REGION -o passwd_file=passwd -o url=$URL -o nomultipart -o use_path_request_style
Our script expects the following environment variables to work.
ACCESS_KEY_ID:: The access key IDORACLE_CLOUD_SECRET: The secret key Those two are credential pairs from Oracle Cloud. You can grab them from your profile on Oracle Cloud. In case you are using another cloud provider, refer to the documentation to grab those credentials.TENANT_ID: Your Oracle Cloud tenant ID. is the unique identifier of your Oracle Cloud account.REGION: The region where your bucket is located. With the tenant ID and the region, we can build the bucket format. Oracle cloud storage uses the following URL format:URL=https://$TENANT_ID.compat.objectstorage.$REGION.oraclecloud.com
If you are using a different cloud provider than S3 or OracleCloud, check out this guide, it illustrates how to define the URL to access the content of your bucket. You can also check the respective cloud provider documentation.
OCI_BUCKET: Is the bucket nameMOUNT_POINT: This is the path where we are mounting our files in the container.
The command creates a file called passwd and they put the credentials inside it. Then they change the permission of the file. Permission 600 means read and write from the owner and no other permission from the group and others.
The main command s3fs mounts the bucket to the mount point.
The flags -f and -d are for debugging purposes.
Let us create a docker container that uses that script.
Second Step : Build the container image.
Let us create the docker image using the following DockerFile:
FROM anujkosambi/s3fs-fuse

ENV MOUNT_POINT /var/s3
RUN mkdir -p $MOUNT_POINT
COPY run.sh run.sh
RUN chmod +x run.sh
CMD ./run.sh
The docker container pulls from the s3fs-fuse image and copies the run.sh script, changes it permission to be executable, and then executes the script.
If you have the docker file saved as DockerFile and your run script saved as run.sh at the same location you can build your container using:
docker build -t espymur/s3fs:latest -f DockerFile .
-
Third Step: Starting the docker container.
In order run the container you need the values of your environment variables. Go to your cloud console and collect the environment variables. Then run the following command:
docker run --privileged -i -e ORACLE_CLOUD_SECRET=your_secret -e OCI_BUCKET=bucket_name -e REGION=your-region -e TENANT_ID=your_tenant-id -e ACCESS_KEY_ID=acces_key_id espymur/s3fs:latest
Note the --privileged mode. It permits the docker container to write to the container host. You can read more about it here
If everything is fine you should be able to exec a command in your container like this to check if the data in your bucket are there.
docker exec -it container_id ls /var/s3
The command should put the content of your bucket.
Now we can mount the bucket content in our docker container, let us see how to use that in a Kubernetes environment.
With we have achieved what we can see in the following image:
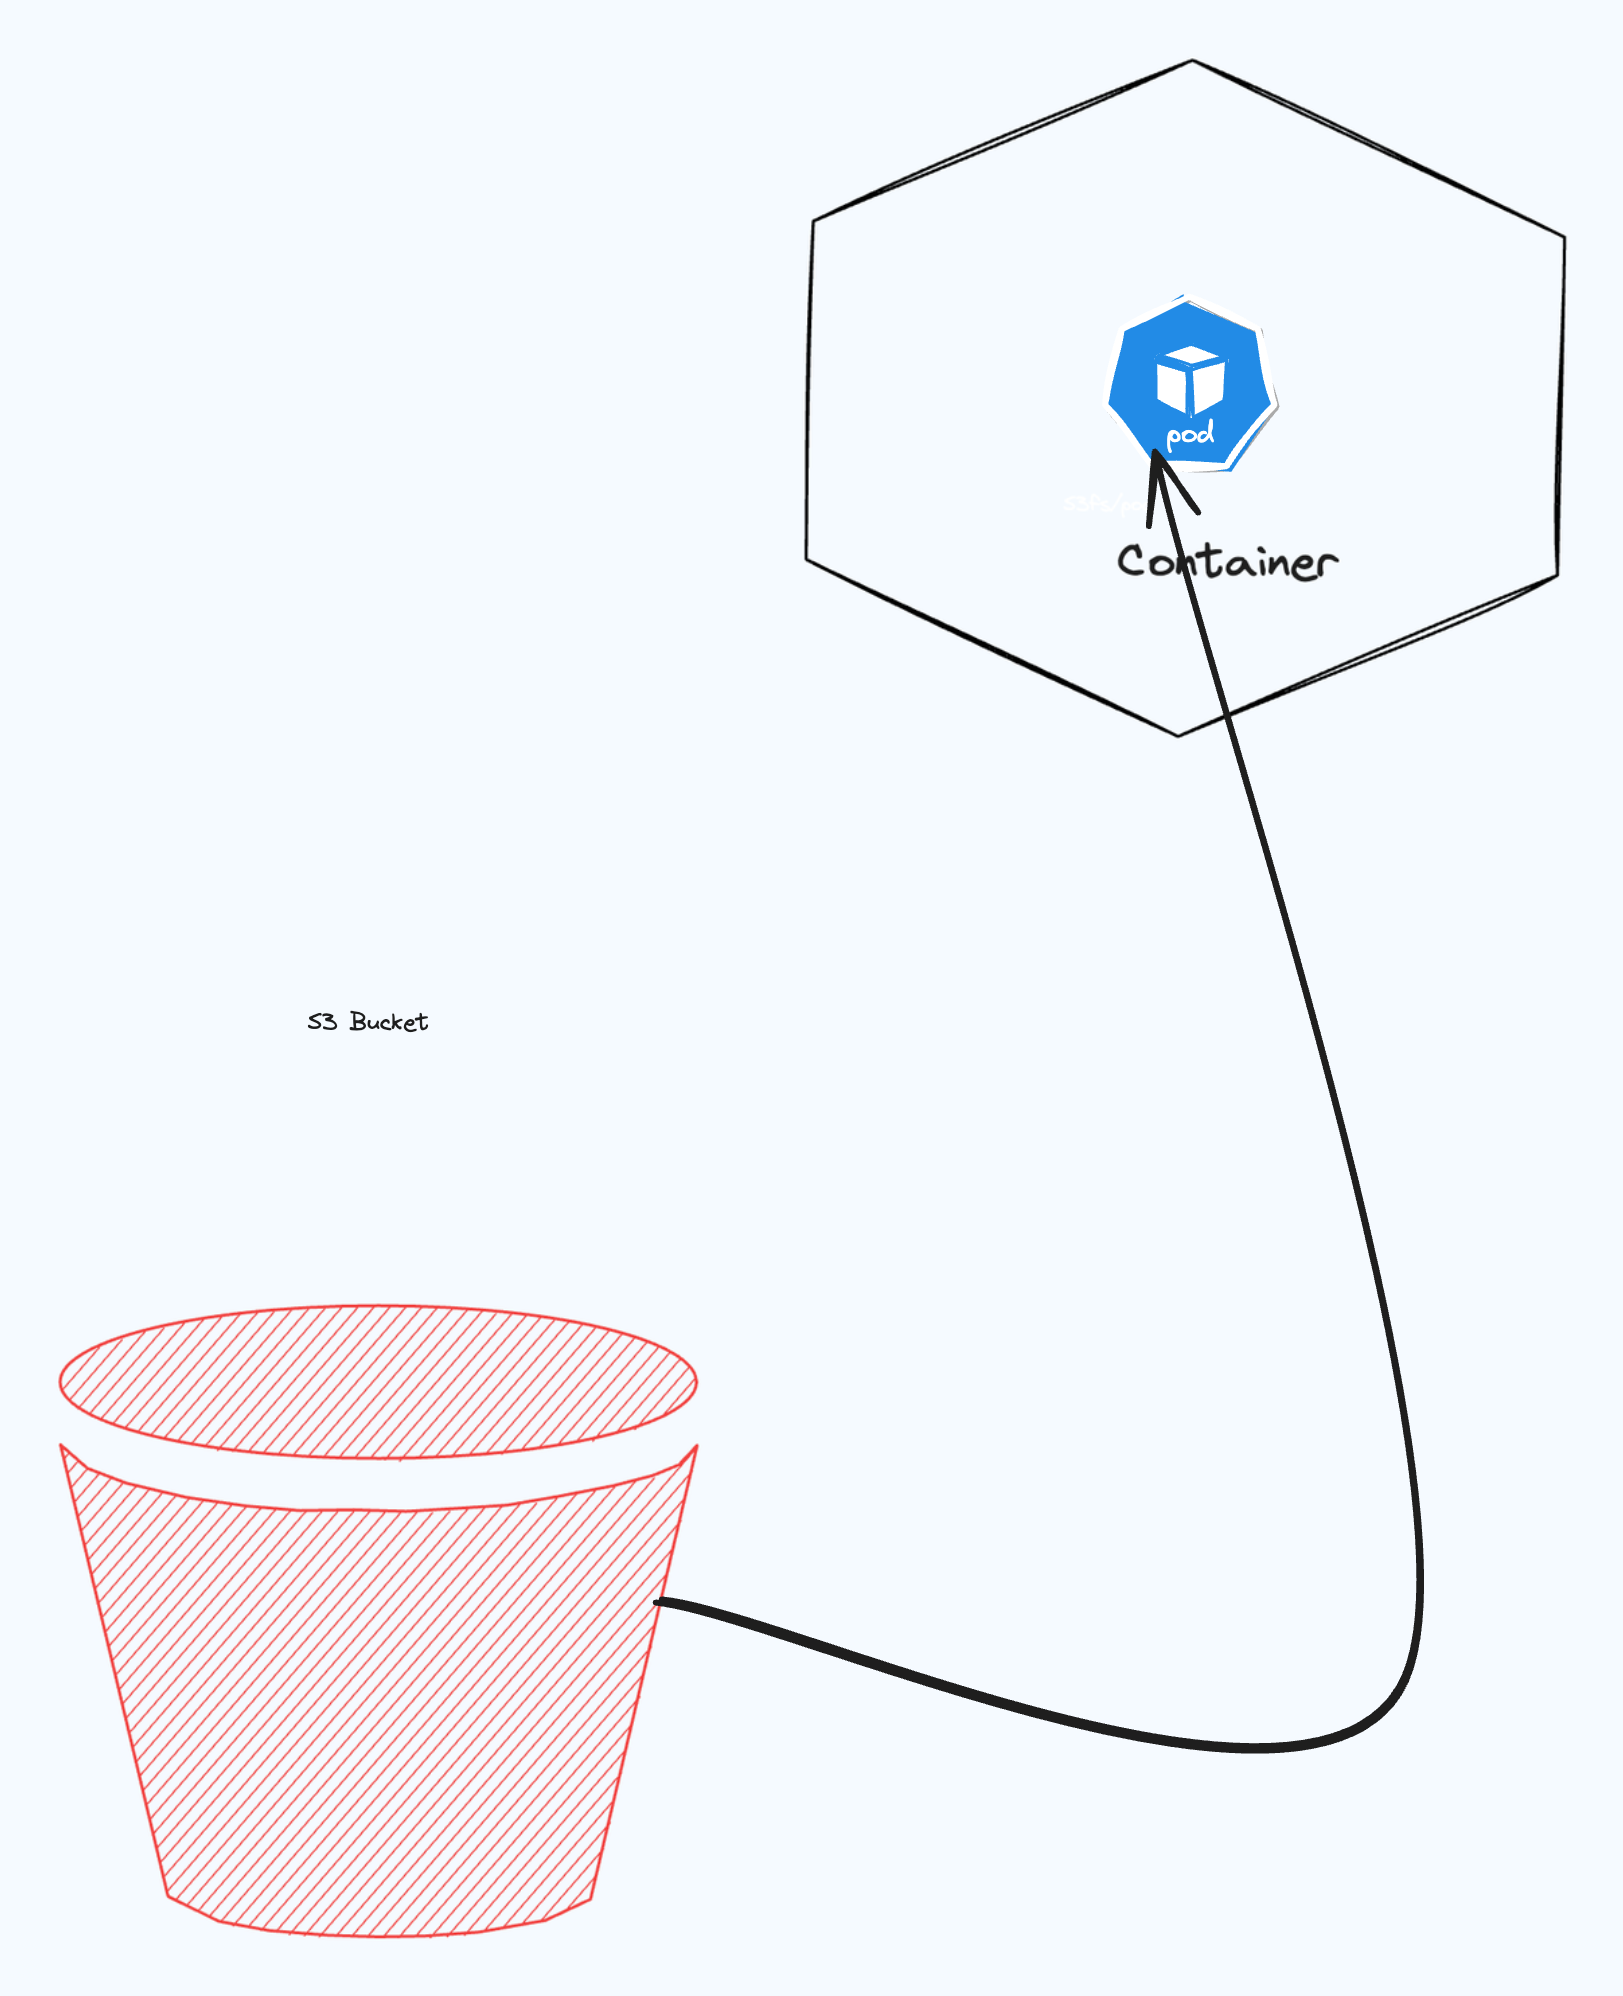
Then comes Kubernetes.
Now that the bucket mounts as in your docker container, let’s see how it would work in practice with Kubernetes.
Our end goal is to deploy a Machine Learning model in a Kubernetes cluster. The bucket will act as our model repository, and It will host our Machine Learning model.
The first component we will create is a Secret, then we will create a DaemontSet.
Kubernetes Secrets.
A Secret is an object that contains a small amount of sensitive data such as a password, a token, or a key. Such information might otherwise be put in a Pod specification or in a container image. Using a Secret means that you don’t need to include confidential data in your application code.
For our usecase our secret are the Oracle cloud credentials. Please note that kubernetes secret should not be shared with git. We need to add the it path to .gitignore
Here is how we will defines our kubernetes secrets:
apiVersion: v1
kind: Secret
metadata:
  name: oracle-cloud-credentials
type: Opaque
data:
  ORACLE_CLOUD_SECRET: "secrets hashed in base64="
  OCI_BUCKET: "Your hashed in base64="
  REGION : "region hashed in base64="
  TENANT_ID: "tenant id hashed in base64"
  ACCESS_KEY_ID: "access key hashed in base64"
Note that the values in our secrets are the real values of our secrets hashed in base64. Using the following command.
echo -n 'oursecret' | base64.
We create the secrets with kubectl apply -f secret.yaml
DaemonSet Component.
A DaemonSet ensures that all (or some) Nodes run a copy of a Pod. As nodes are added to the cluster, Pods are added to them. As nodes are removed from the cluster, those Pods are garbage collected. Deleting a DaemonSet will clean up the Pods it created.
A DaemonSet is the perfect component for our use case, we want to mount our bucket in all the nodes of our Kubernetes cluster in order to make the storage available to all pods that are running on the node.
The DaemontSet will help us to achieve what we can view on this picture:
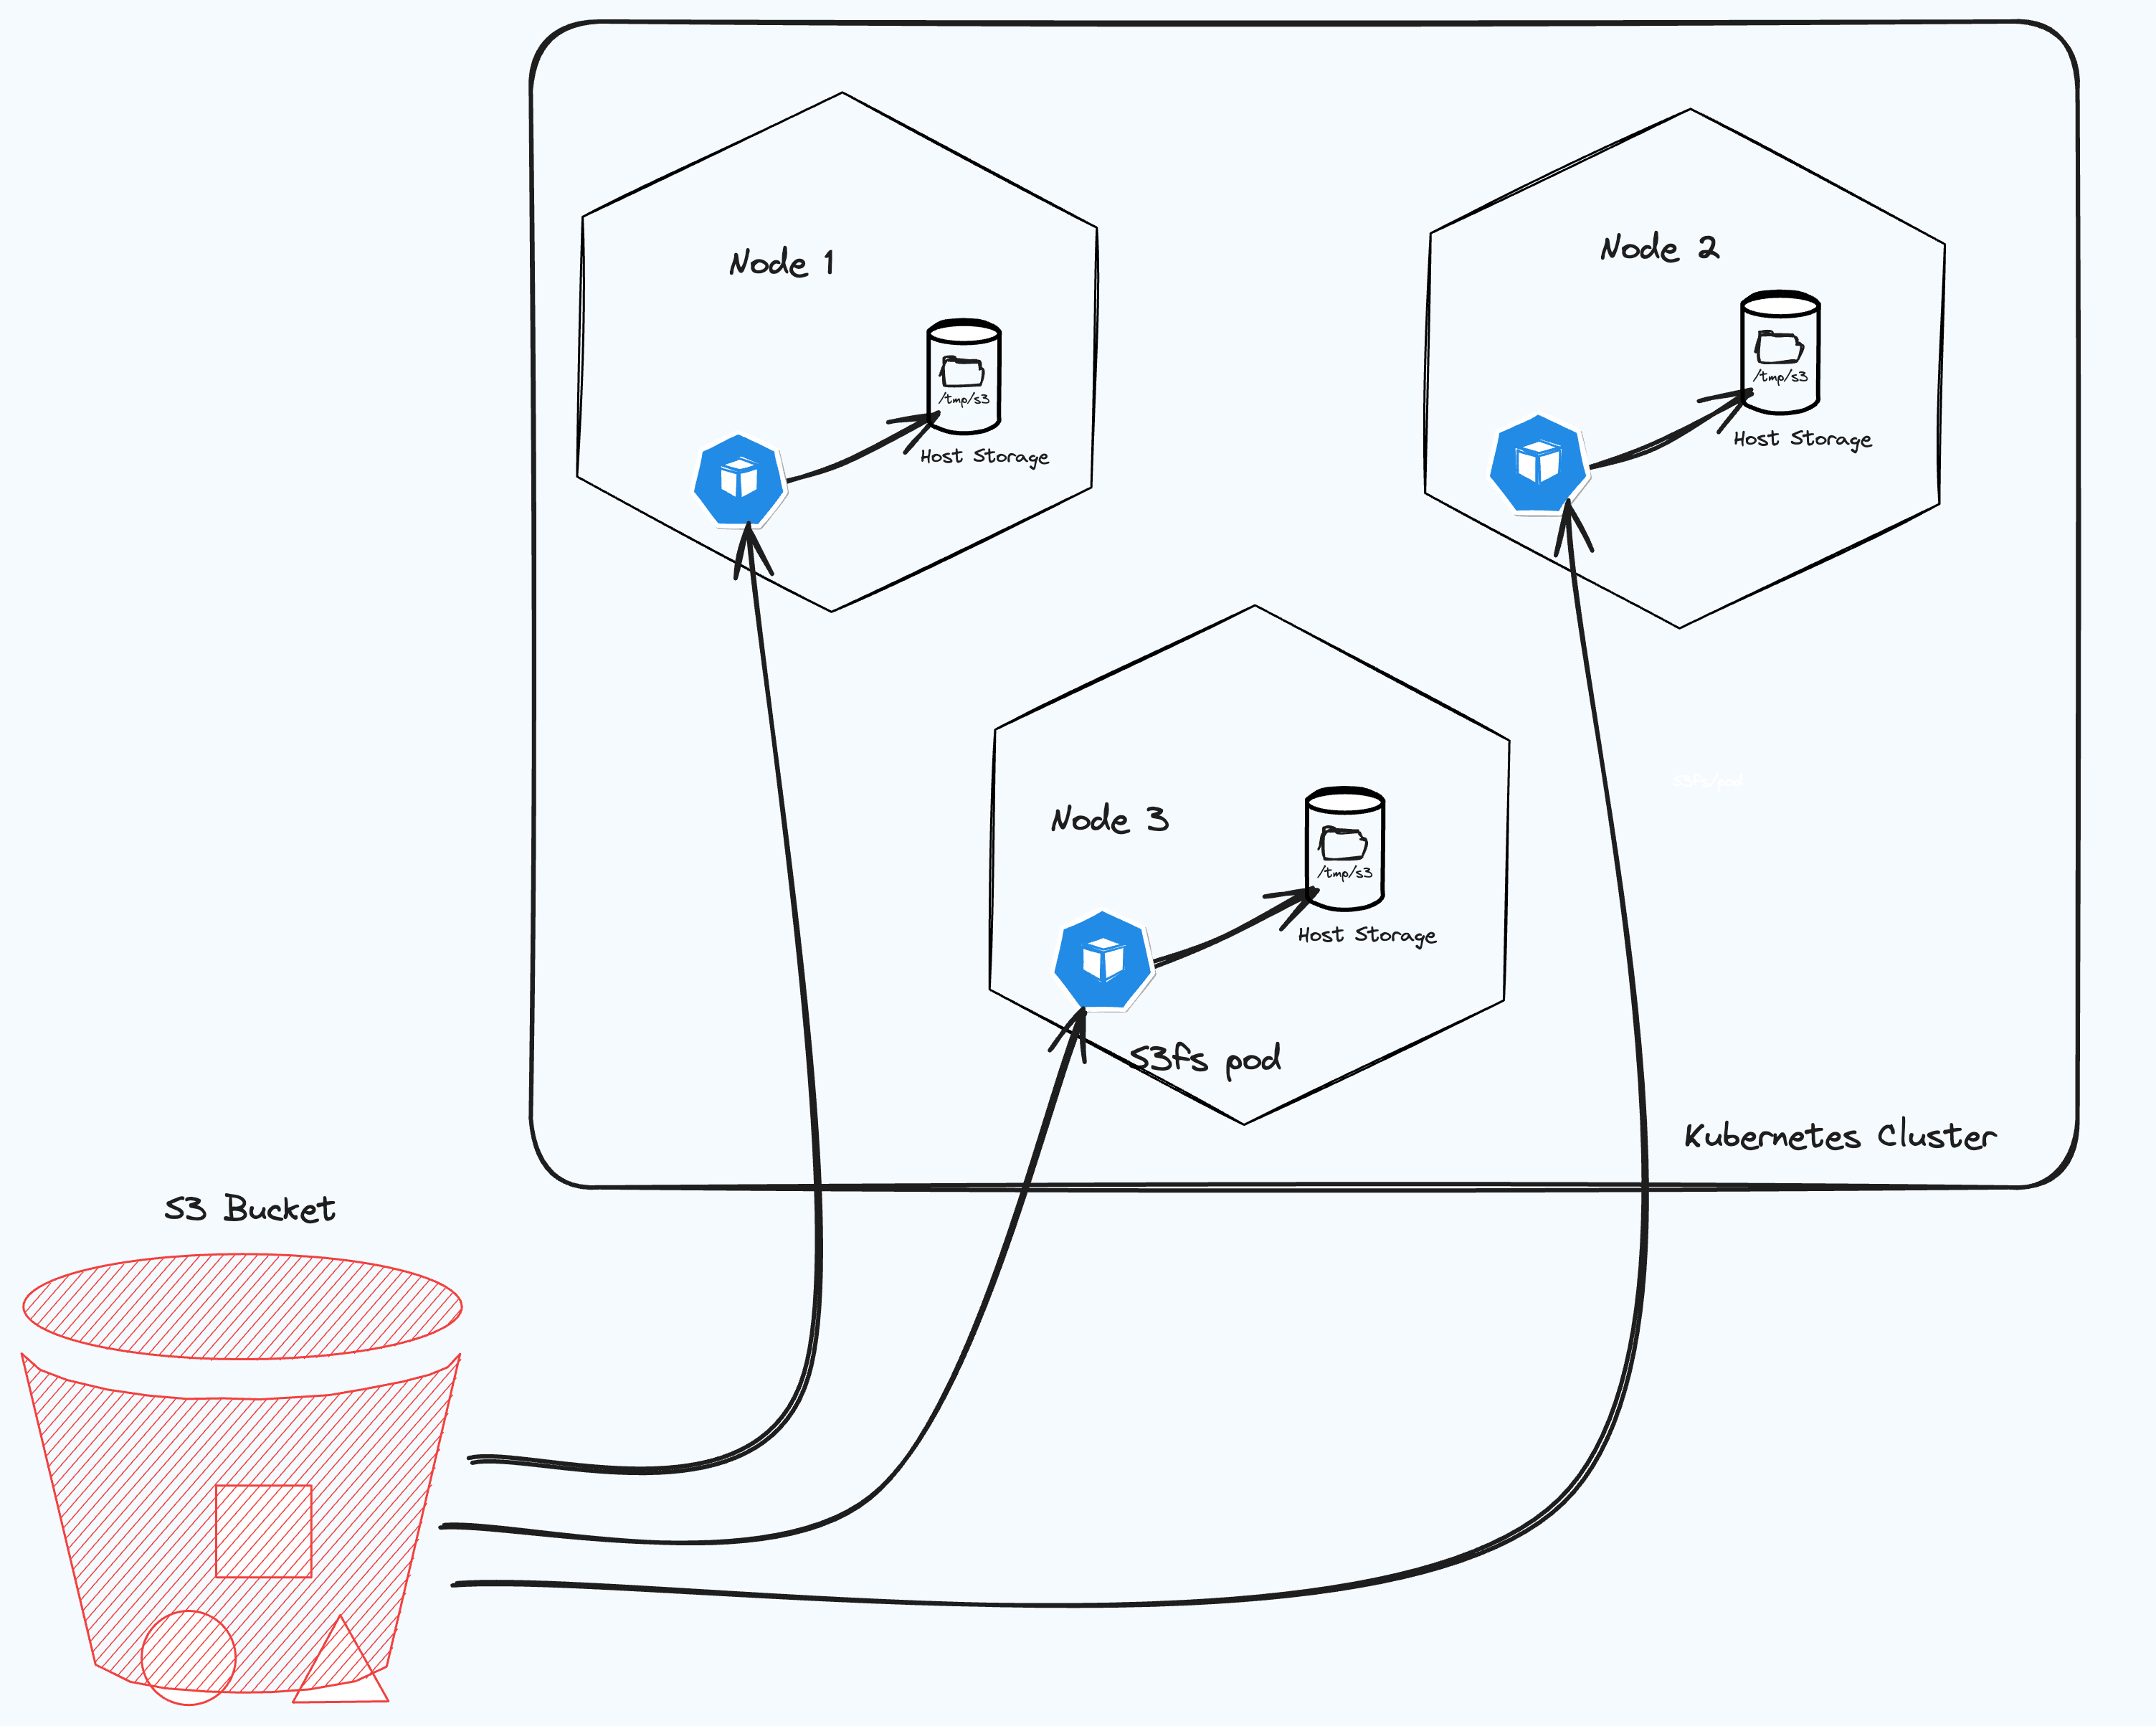
I came across this component type when I was researching this tutorial.
Here is how we create the DaemonSet:
apiVersion: apps/v1
kind: DaemonSet
metadata:
  labels:
    k8s-app: oracle-cloud-provider
  name: oracle-cloud-provider
spec:
  selector:
    matchLabels:
      name: oracle-cloud-provider
  template:
    metadata:
      labels:
        name: oracle-cloud-provider
    spec:
      containers:
        - name: oracle-cloud-fuse
          image:  uk-london-1.ocir.io/lrtfqsmony6u/s3fs:latest
          imagePullPolicy: Always
          securityContext:
            privileged: true
          envFrom:
            - secretRef:
                name: oracle-cloud-credentials
          volumeMounts:
            - name: devfuse
              mountPath: /dev/fuse
            - name: oracle-cloud-fs
              mountPath: /var/s3
              mountPropagation: "Bidirectional" # this was the key to make it work.
      volumes:
        - name: devfuse
          hostPath:
            path: /dev/fuse
        - name: oracle-cloud-fs
          hostPath:
            path: /tmp/s3
As you can see the Daemonset syntax is familiar to the Deployment syntax, they both define pods and volumes.
This Daemonset defines the container, this is the container we defined previously and it runs the s3fs code that mounts the bucket. You can check, we are running it with SecurityContext privileged which is the equivalent of the docker mode --privileged
The VolumeMounts argument defines the original path of the content (files ) we want to mount in our container.
The Volume definition, on the other hand, defines the volume mount path in the host system, for this case our Kubernetes nodes.
This means that the content of the /var/s3 folder in our container will be mounted to the /tmp/s3 folder in our docker container. The hostPath argument needs to be a writeable folder in our docker container.
The mount propagation argument is important to make the mapping work, I spent hours trying to figure out this parameter to make my mount work.
From the Kubernetes documentation we can read that:
HostToContainer- This volume mount will receive all subsequent mounts that are mounted to this volume or any of its subdirectories.-
In other words, if the host mounts anything inside the volume mount, the container will see it mounted there.
Similarly, if any Pod with
Bidirectionalmount propagation to the same volume mounts anything there, the container withHostToContainermount propagation will see it. -
Bidirectional- This volume mount behaves the same theHostToContainermount. In addition, all volume mounts created by the container will be propagated back to the host and to all containers of all pods that use the same volume.#### Warning:
Bidirectionalmount propagation can be dangerous. It can damage the host operating system and therefore it is allowed only in privileged containers. Familiarity with Linux kernel behavior is strongly recommended. In addition, any volume mounts created by containers in pods must be destroyed (unmounted) by the containers on termination.
PS: I had some issues dealing with the container termination. If the Dameonset is not terminated properly the volume path will not work in the subsequent run. You have to change the path when you run it again to make it work. We will create our Daemonset with
kubectl apply -f daemonset.yaml
The Daemonset will create a pod in each node of our cluster, you can check the pods with
kubectl get pods
You will see the pod running.
To check if the mount is working, you can ssh into your nodes and list the content of /tmp/s3. Should everything works correctly, you should be able to see the content of the bucket.
If not check the logs our your pod to see what went wrong.
To ssh nodes in the cluster, you can use this kubernetes plugin.
If the Daemonset is working, go to the next step which is using it with the deployment to deploy models.
I have read that using a docker container with privileged mode offers security risk and may not be advised in a high-security environment. If that is your use case you can try to use Persisent Volume to achieve the same results.
Conclusion
To summarise, this posts has shown us how to mount the content of Object Storage like S3 in docker volume. We leverage the s3fs library and we mounted the strorage inside container. Finally, we used a Daemonset pod to share the content of our container with the nodes in our Kubernetes cluster.
To know how this is done, go ahead and read part 3 of these series of posts where I will show how to deploy Machine Learning model using the created volume.
In the next post, we will learn how to use that volume in a Machine Learning application.
References
Comments